Arduino RFID access control with Eeprom storage
An Arduino sketch to do access control with RFID tags. The RFIDs are stored in the EEPROM of the
Arduino.
Description:
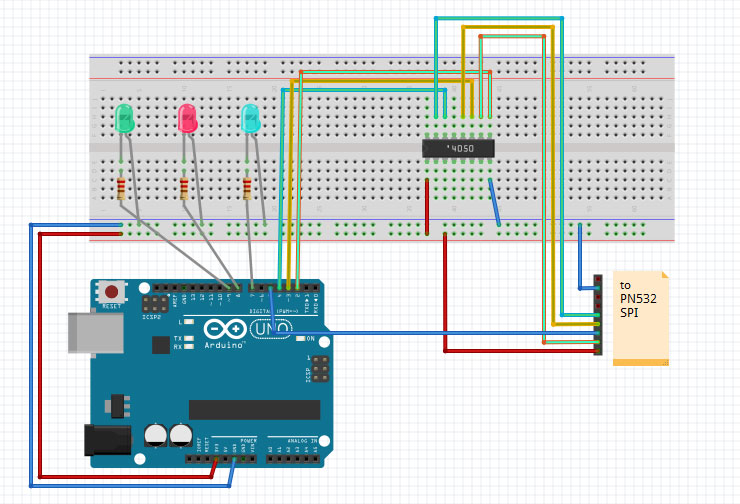
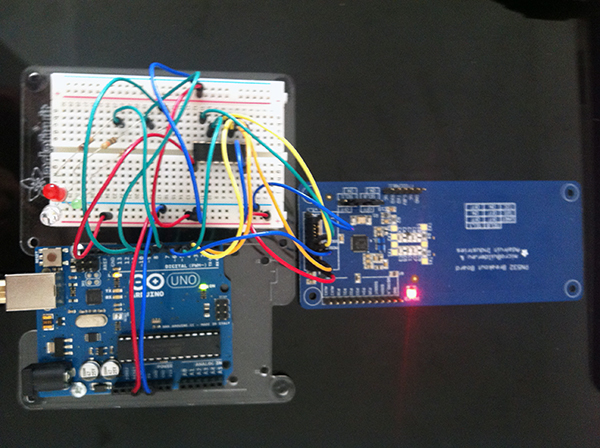
This is a sketch developed to work with the Adafruit PN532 NFC/RFID breakout board, the wiring is explained at Adafruit. The sketch is an RFID (access) control system that stores RFIDs to EEPROM. All RFID cards stored in EEPROM will be granted access, all others will be denied access. It is designed to work with Mifare Classic and Mifare Ultralight cards (no other cards have been tested). To store or delete RFIDs from EEPROM a 'MASTER' card is used. The UID of the master card is for the time beeing hard-coded in the sketch. It has to be a Mifare Classic 4 byte card. When the MASTER card is read by the reader the application will remain in MASTER MODE for 30 sec. It will include or exclude the next RFID card that is read. If the RFID is already stored in the EEPROM it will be erased (excluded), if the RFID is not in the EEPROM it will be stored (included) into the EEPROM.
The EEPROM rfid storage is organised as following (example):
|uidLength|uid byte|uid byte|uid byte|uid byte|uidLength|uid byte|uid byte|uid byte|uid byte|uidLength|uid byte|uid byte|uid byte|uid byte|uid byte|uid byte|uid byte|uidLength|....| end |
| 4 | BE | 23 | 2D | DE | 4 | AB | 20 | FE | 2D | 7 | 2B | BE | 88 | FE | 20 | EC | EC | 4 |....| 0 |
The source code is downloadable from github.
Features:
Installation howto:
The sketch has been tested with an ArduinoUNO - v3. and the PN532 NFC/RFID controller breakout board - v1.3
- Download the Adafruit-PN532 SPI library and put it into your Arduino IDE library folder (restart the IDE).
- Load the sketch into you Arduino IDE.
- Upload the Sketch and connect to the serial console.
- Read a Mifare Classic 4 byte card that you want to use as your MASTER card and replace the UID (int value) from the serial console output to the sketch: uid_master = 1344082563;
- Go to the setup() section and uncomment initializeEeprom();
- Upload the Sketch again and run the sketch one time (connect to serial) and check that the eeprom address values are all 0
- Comment again the initializeEeprom(); and upload it to your Arduino. Now you can use the MASTER card to store new RFIDs to the eeprom.
Set the EEPROMSize constant to your Arduino's EEPROM size, do not exceed the maximum eeprom size address. You can however shrink the eeprom size used for the UID storage by decreasing the EEPROMSize value and/or setting the memBase to use for UID storage to a higher value than 0 (first address of eeprom).
You need the baud rate to be 115200 because we need to print out the data and read from the card at the same time.
Read different RFIDs and watsh the LEDs and/or the serial console output. The green LED indicates that an RFID is
authorised (stored in eeprom). The red LED indicates that an RFID is not authorised (not in eeprom). The blue LED
indicates that the sketch is in MASTER mode (store or delete the following RFID read from eeprom). If all LEDs
are on the eeprom is full.
To actually open a door or do other things you have to add your own code and hardware (relais for electric
door etc). Add your code in the section commented with: // open door
We are a small startup company, if you like what we are doing it would help us if you reference us.